Creating a multi-tenant .NET Core Application - Tenant containers

Posts in this series
- Creating a multi-tenant .NET Core Application - Tenant resolution
- Creating a multi-tenant .NET Core Application - Tenant containers (This post)
- Creating a multi-tenant .NET Core Application - Tenant specific options
- Creating a multi-tenant .NET Core Application - Tenant specific authentication
- Migrating multi-tenancy to .NET Core 3.1 (LTS)
Update 2024-04-13
I’ve recently taken another look at multi-tenancy in ASP.NET Core 8 and written a new series of posts which you can find here. I’d recommend checking that out if you are looking to implement multi-tenancy in your application.
The code for the new approach is available on GitHub and there’s a NuGet package which you can use to implement multi-tenancy in your application.
Update 2019-10-01
This post is compatible with .NET Core 2.2 only. We make this compatible with .NET Core 3.1 (LTS release) in this post here.
Introduction
This post looks at how to configure services on a per-tenant basis. This allows us to resolve a different service or instance based on which tenant is active.
Why have tenant specific containers?
There are three standard scopes supported by the default ASP.NET Core dependency injection provider
- Transient - new instance each time one is requested
- Scoped - new instance for each HTTP request
- Singleton - new instance the first time it is requested
This covers most scenarios you’ll need in a standard web app, however when operating in a multi-tenant environment we really need to support a different singleton scoped instance per tenant
- TenantSingleton - new instance the first time it is requested for each tenant
Why do we need a TenantSingleton dependency scope?
We generally registers services as transient wherever possbile because it’s simple to design, however some classes like HttpClient or DocumentClient perform best when registered as a singleton as they are expensive to create. These instances might have different state depending on the tenant. In the case of the DocumentClient each tenant might have a different endpoint and authentication key.
If you can restrict yourself to the transient service lifetime, then you won’t need the complexity of tenant specific containers, but if you’re still interested, carry on below.
Implementation
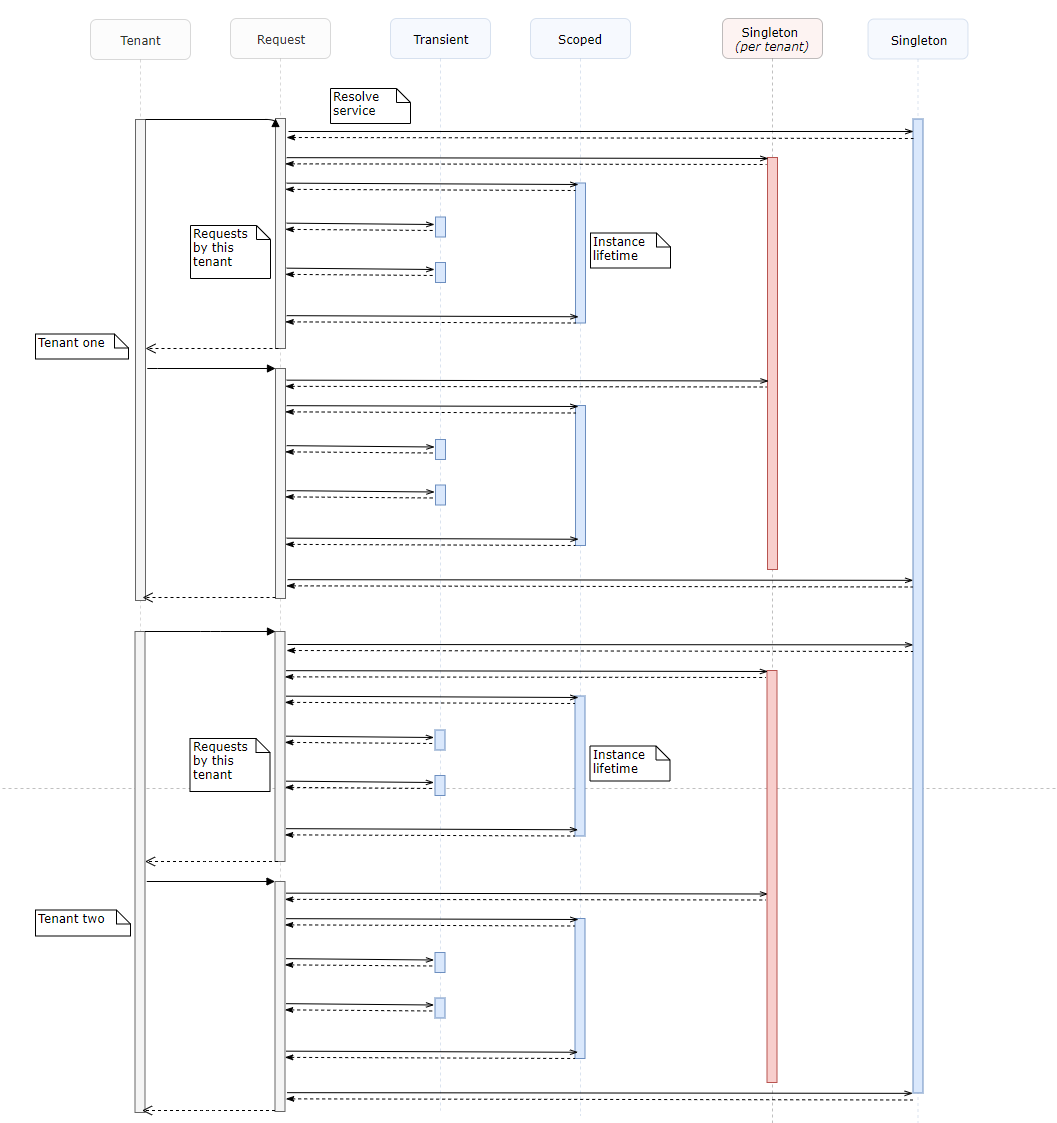
Let’s start with a diagram describing what we want to achieve. The first two columns in grey represent the tenant and request context. The columns in blue represent the dependency scopes available to us and the lifetime of instances in that scope. I’ve added the new tenant singleton dependency scope we wish to implement in red so we can see how it relates to the default scopes available.
We are going achieve the new scope by implementing a custom lifetime management policy. Since the default services container does not support custom lifetime management, we will be switching it out with Autofac.
Architecture
Before I get started here, I just want to call our the fantasitc work that’s been done in the Autofac.Multitenant library. Have a read through the source code to get a good understanding of the approach I’ve gone with.
There are 5 main steps to our solution
- Create a custom
IContainer: We need to detect the current tenant and resolve services from that tenant’s configured scope - Create middleware to set the request
IServiceProvider: This is so we set the service container to correct scope for the current tenant on each request (We get the current tenant at request time, not startup) - Create an
IServiceCollectionextension method: This is to support a nice developer experience for configuring tenant specific services - Create an
IApplicationBuilderextension method: This is to support a nice developer experience for configuring the tenant container middleware - Register the services and middleware in
StartUp: This is where all the tenant specifc serivice configuration goes
1. Create a custom IContainer
This is the heart of the solution, everything else is just integration with ASP.NET Core. Our custom container is going to wrap around the application container, register and track each tenant’s LifetimeScope and choose the correct LifeTimeScope depending on the current tenant.
I’ve included the main bits of the implementation below, read the comments to see what each bit does.
internal class MultiTenantContainer<T> : IContainer where T : Tenant
{
    //This is the base application container
    private readonly IContainer _applicationContainer;
    //This action configures a container builder
    private readonly Action<T, ContainerBuilder> _tenantContainerConfiguration;

    //This dictionary keeps track of all of the tenant scopes that we have created
    private readonly Dictionary<string, ILifetimeScope> _tenantLifetimeScopes = new Dictionary<string, ILifetimeScope>();

    private readonly object _lock = new object();
    private const string _multiTenantTag = "multitenantcontainer";

    public MultiTenantContainer(IContainer applicationContainer, Action<T, ContainerBuilder> containerConfiguration)
    {
        _tenantContainerConfiguration = containerConfiguration;
        _applicationContainer = applicationContainer;
    }

    /// <summary>
    /// Get the current teanant from the application container
    /// </summary>
    /// <returns></returns>
    private T GetCurrentTenant()
    {
        //We have registered our TenantAccessService in Part 1, the service is available in the application container which allows us to access the current Tenant
        return  _applicationContainer.Resolve<TenantAccessService<T>>().GetTenantAsync().GetAwaiter().GetResult();
    }

    /// <summary>
    /// Get the scope of the current tenant
    /// </summary>
    /// <returns></returns>
    public ILifetimeScope GetCurrentTenantScope()
    {
        return GetTenantScope(GetCurrentTenant()?.Id);
    }

    /// <summary>
    /// Get (configure on missing)
    /// </summary>
    /// <param name="tenantId"></param>
    /// <returns></returns>
    public ILifetimeScope GetTenantScope(string tenantId)
    {
        //If no tenant (e.g. early on in the pipeline, we just use the application container)
        if (tenantId == null)
            return _applicationContainer;

        //If we have created a lifetime for a tenant, return
        if (_tenantLifetimeScopes.ContainsKey(tenantId))
            return _tenantLifetimeScopes[tenantId];

        lock (_lock)
        {
            if (_tenantLifetimeScopes.ContainsKey(tenantId))
            {
                return _tenantLifetimeScopes[tenantId];
            }
            else
            {
                //This is a new tenant, configure a new lifetimescope for it using our tenant sensitive configuration method
                _tenantLifetimeScopes.Add(tenantId, _applicationContainer.BeginLifetimeScope(_multiTenantTag, a => _tenantContainerConfiguration(GetCurrentTenant(), a)));
                return _tenantLifetimeScopes[tenantId];
            }
        }
    }

    public void Dispose()
    {
        lock (_lock)
        {
            foreach (var scope in _tenantLifetimeScopes)
                scope.Value.Dispose();
            _applicationContainer.Dispose();
        }
    }

}
The IContainer interface requires a bunch more methods than what’s implmented above, but we’re done with our customisation so just surface them from the TenantLifetimeScope like below
public object Tag => GetCurrentTenantScope().Tag;
2. Create the middleware to select the tenant LifeTimeScope for the current request
The middeware is super simple. It gets the current application container, sets the correct scope for the current tenant, and registers it as the current request’s IServiceProvider.
public async Task Invoke(HttpContext context,
    Func<MultiTenantContainer<T>> multiTenantContainerAccessor)
{
    //Set to current tenant container.
    //Begin new scope for request as ASP.NET Core standard scope is per-request
    context.RequestServices =
        new AutofacServiceProvider(multiTenantContainerAccessor()
                .GetCurrentTenantScope().BeginLifetimeScope());
    await next.Invoke(context);
}
Any middleware registered after this step will be resolve services using the current Tenant LifetimeScope instead of the application level container.
3. Create an IServiceCollection extension to configure the MultiTenantContainer
This extension will allow the developer to configure and register the MultiTenantContainer without needing to know how everthing fits together.
It completes 3 tasks
- Provide an accessor function to access the multi-tenant container from the middleware.
- Build an AutoFac container and create a new
MultiTenantContainer - Return a new
IServiceProviderto replace the default ASP.NET Core one
public static IServiceProvider UseMultiTenantServiceProvider<T>(this IServiceCollection services, Action<T, ContainerBuilder> registerServicesForTenant) where T : Tenant
{
    ContainerBuilder containerBuilder = new ContainerBuilder();

    //Declare our container and create a accessor function
    //This is to support the Func<MultiTenantContainer<T>> multiTenantContainerAccessor parameter in the middleware
    MultiTenantContainer<T> container = null;
    Func<MultiTenantContainer<T>> containerAccessor = () =>
    {
        return container;
    };
    services.AddSingleton(containerAccessor);

    //Add all the application level services to the builder
    containerBuilder.Populate(services);

    //Create and assign the new multiteant container
    container = new MultiTenantContainer<T>(containerBuilder.Build(), registerServicesForTenant);

    //Return the new IServiceProvider which will be used to replace the standard one
    return new AutofacServiceProvider(containerAccessor());
}
4. Create an IApplicationBuilder extension to register the middleware
Nothing amazing here, stock standard overload for a nice developer middleware registration experience
public static IApplicationBuilder UseMultiTenantContainer<T>(this IApplicationBuilder builder) where T : Tenant
    => builder.UseMiddleware<MultitenantContainerMiddleware<T>>();
5. Register the services and middleware in StartUp
This is the most interesting part! This is how we use the above to set up and register all of the services in our tenant aware application.
The key here is to change the method return signature to an IServiceProvider and return our new tenant aware service provider.
public IServiceProvider ConfigureServices(IServiceCollection services)
{
    ...

    //Single instance available to all tenants
    services.AddSingleton(new ApplicationWideInstance());

    return services.UseMultiTenantServiceProvider<Tenant>((t, c) =>
    {
        //This action has access to the tenant object so we can perform tenant specific logic here
        //when deciding which services to register
        //These instances are scoped to the current tenant, so in this example
        //it will be one instance per tenant
        c.RegisterInstance(new TenantSpecificInstance()).SingleInstance();
    });

}
Services defined in the tenant lifetime will override the application level. This is great if you want to inject a different implementation based on some information about the current tenant.
Finally we just need to register the middleware, otherwise the service container won’t be set to the correct scope at the start of the request.
public void Configure(IApplicationBuilder app, IHostingEnvironment env)
{
    ...

    app.UseMultiTenancy()
        .UseMultiTenantContainer();

}
Example
To illustrate tenant specifc instances we will create a new class which gets an Id on creation.
public class OperationIdService
{
    public readonly Guid Id;

    public OperationIdService()
    {
        Id = Guid.NewGuid();
    }
}
And register it as a tenant specifc singleton
return services.UseMultiTenantServiceProvider<Tenant>((t, c) =>
{
    c.RegisterInstance(new OperationIdService()).SingleInstance();
});
We will create a controller which returns the current operation Id from the injected instance
[Route("/api/{tenant}/values")]
public class ValuesController : Controller
{
    private readonly OperationIdService _operationIdService;

    public ValuesController(OperationIdService operationIdService)
    {
        _operationIdService = operationIdService;
    }

    [HttpGet(""), AllowAnonymous]
    public async Task<ActionResult> GetOperationIdValue()
    {
        return Ok(_operationIdService.Id);
    }
}
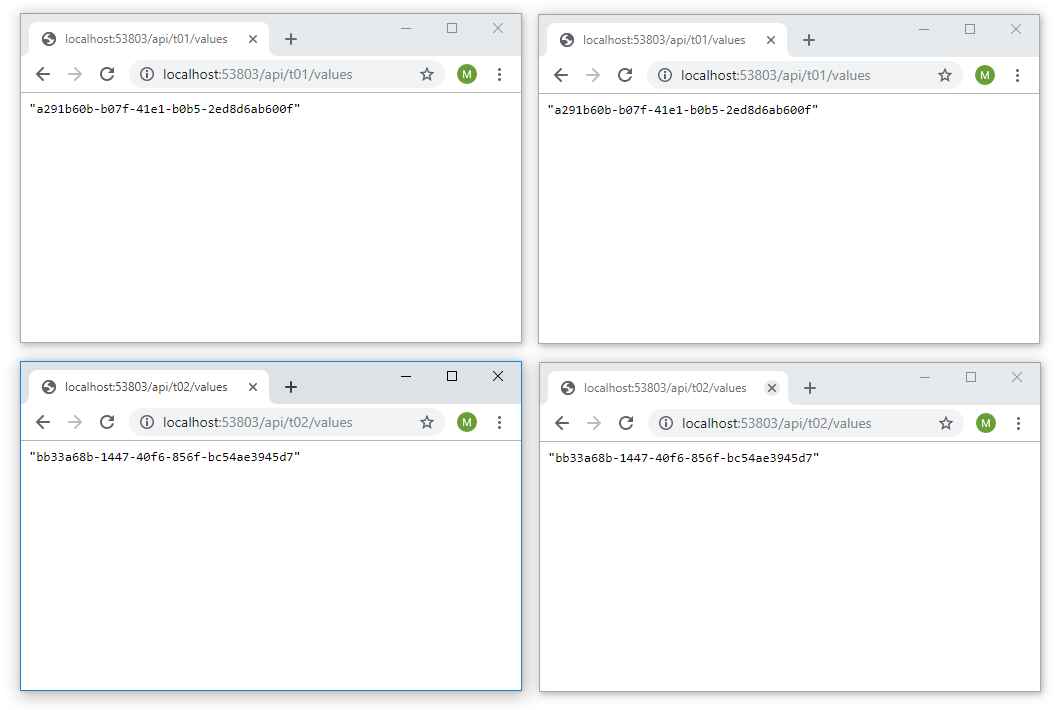
No matter how many requests you make to the same tenant the id will remain the same, however if you make a request to a second tenant the id will change as it has a different instance of the OperationIdService object.
In the screenshot below the current tenant is in the URL, either t01 or t02.
Wrapping up
In this post we looked at how we can upgrade ASP.NET Core to support the concept of a TenantSingleton using syntax which is very similar to how services are registered in ASP.NET core by default. It also supports any application level serivces that have already been registered which makes it suitable to add to an existing project without needing to rewrite all the existing service registration logic. ⚡🎉