Setting up an elasticsearch cluster in azure

One of the best things about Azure is that you can set up most of your favourite software on it regardless of its roots. In this blog post we’ll investigate how to set up an elasticsearch cluster on Windows Azure.
Elasticsearch is a powerful open source search engine that makes data easy to explore. To be honest, it’s unfortunate it has search in its name because it’s capable of so much more.
The set up
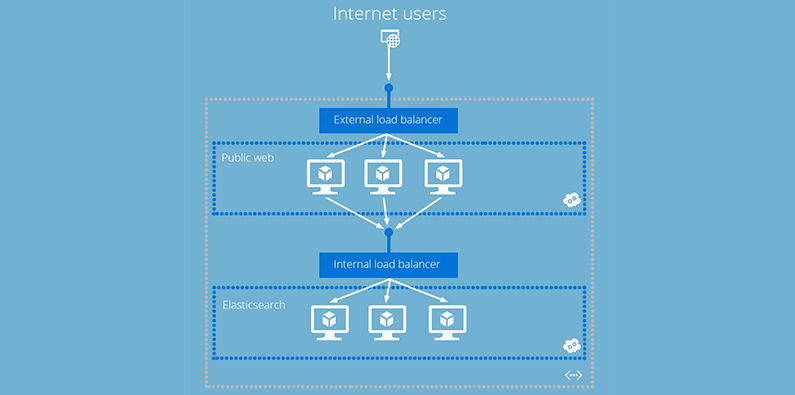
We’ll set up our cluster so that it can be used in a stock-standard multi-tier web application. In our configuration we will have a public facing web application that is using the elasticsearch cluster.
We will use Azure’s new internal load balancing feature to enable us to run a highly available service which isn’t publicly exposed. This means the web application can reference the ILB instead of an individual machine in the cluster.
Initially I wanted to use worker-roles to host elasticsearch however you cannot use the ILB on PaaS services yet. Support is coming soon but until then we will do this whole thing in VMs.
The Azure services that we will make use of are
- Azure Virtual Machines to run Elastic search (in the future we will move to worker roles)
- Internal load balancer
- Virtual Network + Cloud Services
This set-up has two benefits.
- Our elasticsearch cluster is only available internally giving us improved security.
- The web application is insulated from individual machines being removed and added to the cluster.
Virtual Network
How you set up the VNET is highly dependent on your network topology and how you want to access your elasticsearch cluster. For example you could extend your on premises network to Azure and treat the cluster as if it were part of your existing network. We’re just setting up a plain vanilla virtual network as we only want access from Azure hosted cloud services.
Cloud Services
Create a cloud service for your elasticsearch VMs. A cloud service is a logical container of machines in Azure which enables load-balancing. It’s represented in the diagram above as a dark blue dotted box.
Creating the reference image
Our first real task is to create a reference image with elasticsearch installed. I will be using elasticsearch 1.2.1 and Java 1.7u55.
Creating the reference VM
I’m going to install elasticsearch on Windows Server 2012 R2 but you can choose whatever server takes your fancy. It doesn’t matter too much where you create this VM as it’s going to get deleted when you capture it. However the image will be saved to whatever storage account you choose, I like to have a dedicated storage account where I keep all my images.
Once the VM is provisioned install java and elasticsearch, the process is super simple.
-
Install Java
-
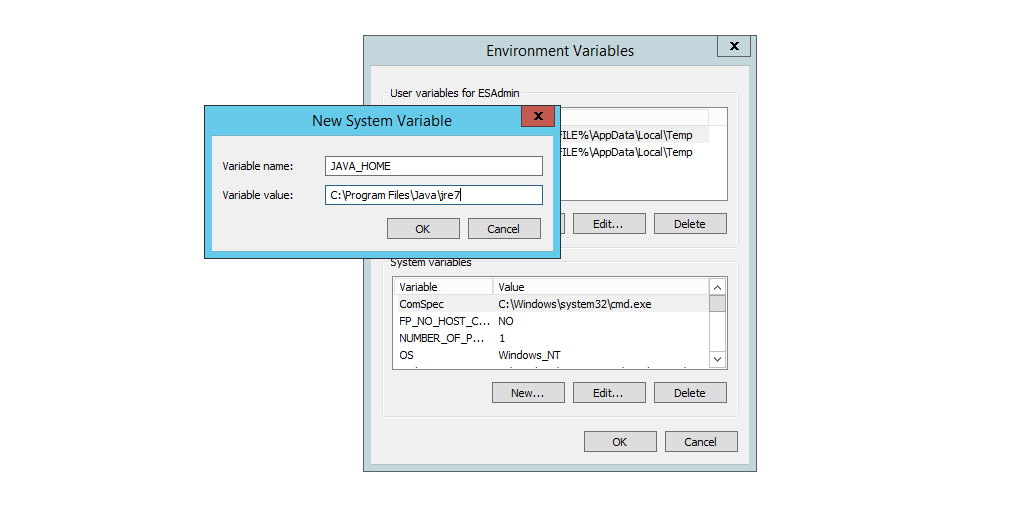
I’m on windows so I need to set JAVA_HOME in the environment variables so programs like elasticsearch know where to find it.
-
Unzip elasticsearch to somewhere on your permanent hard drive (not temporary storage) as you don’t want anything silly to happen like losing all your data.
-
We’re going to be installing this as a service so open up the CMD and run “service install”
-
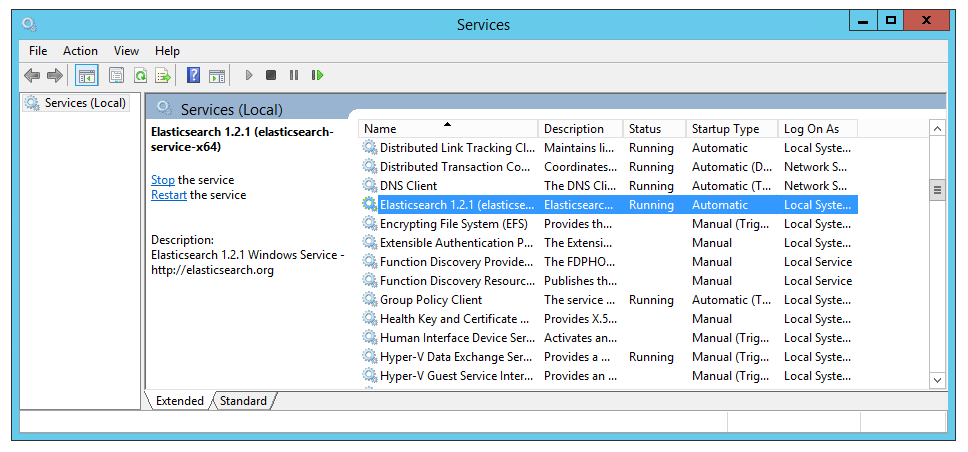
Go into the services panel and set the start up type as “automatic” so that it starts up automatically as we spin up VMs.
-
Great - it’s set up, open up IE and hit
http://localhost:9200to check it’s all working as expected.
You be prompted to download a json file that looks something like this:
{
    "status" : 200,
    ... other stuff...
    "tagline" : "You Know, for Search"
}
Supporting discovery
By default elasticsearch discovers a list of nodes using multicast where you don’t need to configure anything, but this doesn’t work in Azure. There is an official plugin that allows nodes to automatically find each other on Azure but I’m just going to use unicast with a set number of addresses because it’s simpler and this cluster will be upgraded to worker roles when they become available for the ILB.
Azure internal name resolution knows how to resolve the name of VMs within the same cloud service, so I’m just going to specify a couple of host names using a pattern that I can name my VMs as I spin them up, something along the lines of es-01, es-02. directly in the configuration, super simple.
Try specify as many names as possible, specifying only one “master node” will work, but if it goes off-line the nodes will lose their ability to find each other. This will only work for nodes in the same cloud service. (For VMs in different cloud services but still in the same VNET you need to use the FQDN if you don’t want to use the machine’s IP address directly).
Time to get our hands dirty to support this unicast business. Go open the configuration file (be careful, it’s REALLY easy to break).
Disable multicast by uncommenting this line
discovery.zen.ping.multicast.enabled: false
Enable unicast by uncommeting this line and specifying the names of your future VMs
discovery.zen.ping.unicast.hosts: ["host1", "host2:port"]
Elasticsearch communicates with each other on 9200 and 9300 by default, make sure you’ve opened up the firewall.
Capturing the image
Now we just need to run sysprep to get our VM ready for capture and we’re done with the reference machine.
Then go back to the portal and “capture” the VM. The VM will be deleted, don’t worry about that, you’ll be able to create heaps more soon.
Creating the elasticsearch cluster
Now we can configure the cluster.
Add the VMs
Since the elasticsearch service will start when the OS starts we don’t need to remote in to configure anything, it should all just work™
Just make sure that the cloud service, VNET, and availability set are all the same for each VM that you spin up, for the first VM you’ll need to create the availability set. By placing VMs in the same availability set Azure guarantees us that they will be on different racks, subject to rolling updates, and gives us a 99.95% uptime SLA and all that jazz - basically it means our cluster is going to be highly available.
You can actually use PowerShell to script out the process. I’d recommend that you codify the steps into a script once you’re comfortable with them.
Once everything is added you should be left with something like this.
If you want to see the cluster working for yourself, just remote into one of the VMs and check. You will be able to use the browser to issue commands to either node using the VM’s hostname. e.g. http://es-01:9200/ will give you the status of the node on es-01 even if you have remoted into es-02. Hit http://localhost:9200/_nodes?pretty=true to check what nodes have been joined to the cluster.
At this point our cluster is running but we can only connect to it by referencing an individual VM. This is not ideal as if that VM goes down we lose connectivity with the cluster. To solve this we’ll set up an ILB to act as an intermediary between the VMs and our dependent services.
Add the Internal Load balancer
This part is easy but you will have to do this from your own computer using PowerShell as the portal does not provide an interface for creating an ILB at the moment. The instructions on how to do this are here, but I’ll paraphrase below.
The ILB gives us an internal endpoint that we can communicate with the cluster on.
Create the ILB instance
$svc="{Cloud service that your elasticsearch VMs are hosted in}"
$ilb="{Something descriptive}"
$subnet="<Name of the subnet within your virtual network-optional>"
$IP="<The IPv4 address to use on the subnet-optional>"

Add-AzureInternalLoadBalancer -ServiceName $svc -InternalLoadBalancerName $ilb –SubnetName $subnet –StaticVNetIPAddress $IP
Add the endpoints
Remember by default elasticsearch accepts requests on 9200, this is the port that we will be mapping to. Do this for each machine that you’ve added to the cluster.
$svc="{Cloud service that your elasticsearch VMs are hosted in}"
$vmname="<Name of the VM>"
$epname="elasticsearch"
$prot="tcp"
$locport= 9200
$pubport= 9200 (Could be any post you want elasticsearch to be available on)
$ilb="<Name of your ILB instance>"
$ilbsetname = "<Name of the load balanced set>"

Get-AzureVM –ServiceName $svc –Name $vmname | Add-AzureEndpoint -Name $epname -Protocol $prot -LocalPort $locport -PublicPort $pubport -LBSetName $ilbsetname -ProbePort $locpost -ProbeProtocol "tcp" -ProbeIntervalSeconds 15 -ProbeTimeoutInSeconds 31 -InternalLoadBalancerName $ilb | Update-AzureVM
ILB should now be live.
It should have the IP you specified when you created it but to check run
Get-AzureService -ServiceName $svc | Get-AzureInternalLoadBalancer
And you should get something along the lines of
...Some information...
IPAddress                : {the IP address}
...Some more information...
Just use that IP from within the virtual network to access your shiny new elasticsearch cluster. Jump onto any machine on that VNET (that’s not connected to the ILB) and browse to http://{the ILB IP address}:9200/_nodes and you should get a list of nodes on your cluster.
If you browser to http://{the ILB IP address}:9200 and hit refresh, you’ll hit one of the instances. Apparently it’s supposed to be random but in my experience it will stick with one host unless you switch tabs in IE.
Finished!
Woohoo, you’re all done, now your applications can make use of elasticseach while taking advantage of the scalability of the cloud.